What is Digital Signal Processing?
Tools used in this article
-
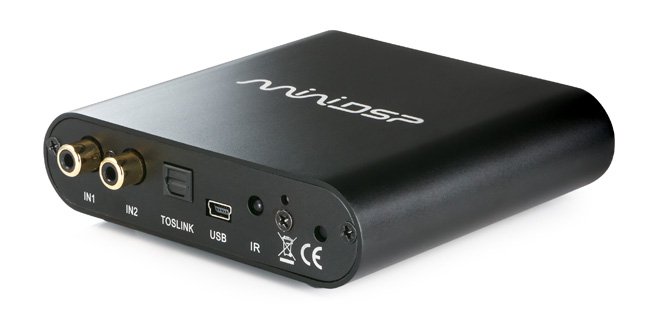 miniDSP 2x4 HD was the exact model we used in this article, but the miniDSP 2x4 will probably work just as well for you, while staying under $100.
-
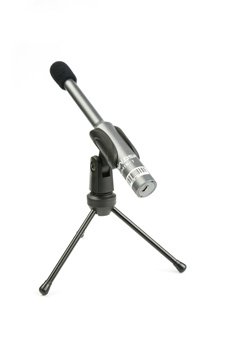 UMIK-1
calibrated omni-directional USB measurement microphone. Price: $75
UMIK-1
calibrated omni-directional USB measurement microphone. Price: $75
-
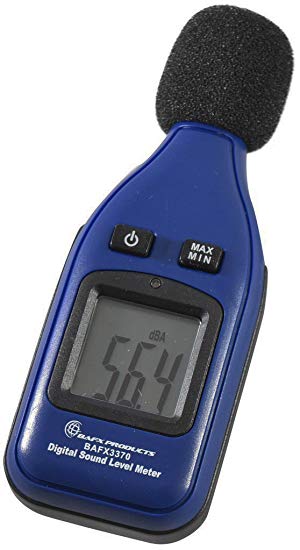 SPL Meter
used for measuring decibel level. There are also phone apps that will do this without buying a dedicated meter. But the cheap one on Amazon is only $18.
SPL Meter
used for measuring decibel level. There are also phone apps that will do this without buying a dedicated meter. But the cheap one on Amazon is only $18.
-
 Room EQ Wizard
a desktop application available for Windows, Mac and Linux, used to calculate the equalization adjustments for you DSP. Cost: FREE
Room EQ Wizard
a desktop application available for Windows, Mac and Linux, used to calculate the equalization adjustments for you DSP. Cost: FREE
Digital Signal Processing (abbreviated DSP) is the use of a computer or other specialized processors to break an audio signal into it's component frequencies and then alter characteristics of the audio signal. The most common reason for doing this in your audio system is to equalize the frequency response of your speakers so that you have a nice even response across the entire audible frequency range.
Getting Set Up
If you have all of the necessary miniDSP hardware, there are also a couple of things you'll need to download from the miniDSP website.
Where to Find miniDSP Controller Software
When you first get your miniDSP, there will be a card inside the box with a coupon code. This coupon code is for a free copy of the controller software used to set anything on your miniDSP. The process on the website was a little bit kludgy. It will require you to set up an account on their website. After going to the URL on the card (usually the url is https://minidsp.com/coupon), you will need to go to the area of the website called (User Downloads. On this page, you will find links to download the software you just activated with your coupon.
You will need this controller software to do anything with your miniDSP.
Where to Find miniDSP Measurement Microphone Calibration File
If you have the miniDSP UMIK-1 measurement microphone, you will need to download the calibration files for your microphone. miniDSP makes a unique calibration for each microphone they produce. You'll need to look on your microphone for the serial number. Then go to the UMIK-1 product page, scroll down to a section called "Unique Calibration File Download". There you will find a form to input your microphone's serial number and you will be directed to download the calibration files.
There will be two calibration files that match your microphone's serial number. One is the normal calibration file you will use when pointing the microphone as a speaker. The other (which will have a name ending in "90deg", is used when you are testing all of your speakers together, and you are pointing the microphone directly at the ceiling (hence the 90 degrees pointed straight up).
Getting Started With Room EQ Wizard
Room EQ Wizard (known as REW, pronounced 'roo') is a great program written by a great engineer. It was not developed by a user experience expert. It's the perfect program for it's purpose (measuring and equalizing speakers). But many of the key tools can be hidden in plain site in the interface. Two of the most important functions we're about to look at are used by clicking what looks like labels in the interface. You'll see soon...
You will need a way in your audio system to connect to your computer, so that your computers audio output will be going into your audio amplifier. The easiest way to do this is with a aux cable with RCA plugs on one in and a mini headphone jack on the other end. Just plug the headphone jack into your laptop, and run the RCA connections to your preamp or amplifier. Once your computer is able to play sound through your speakers, we're ready to start measuring.
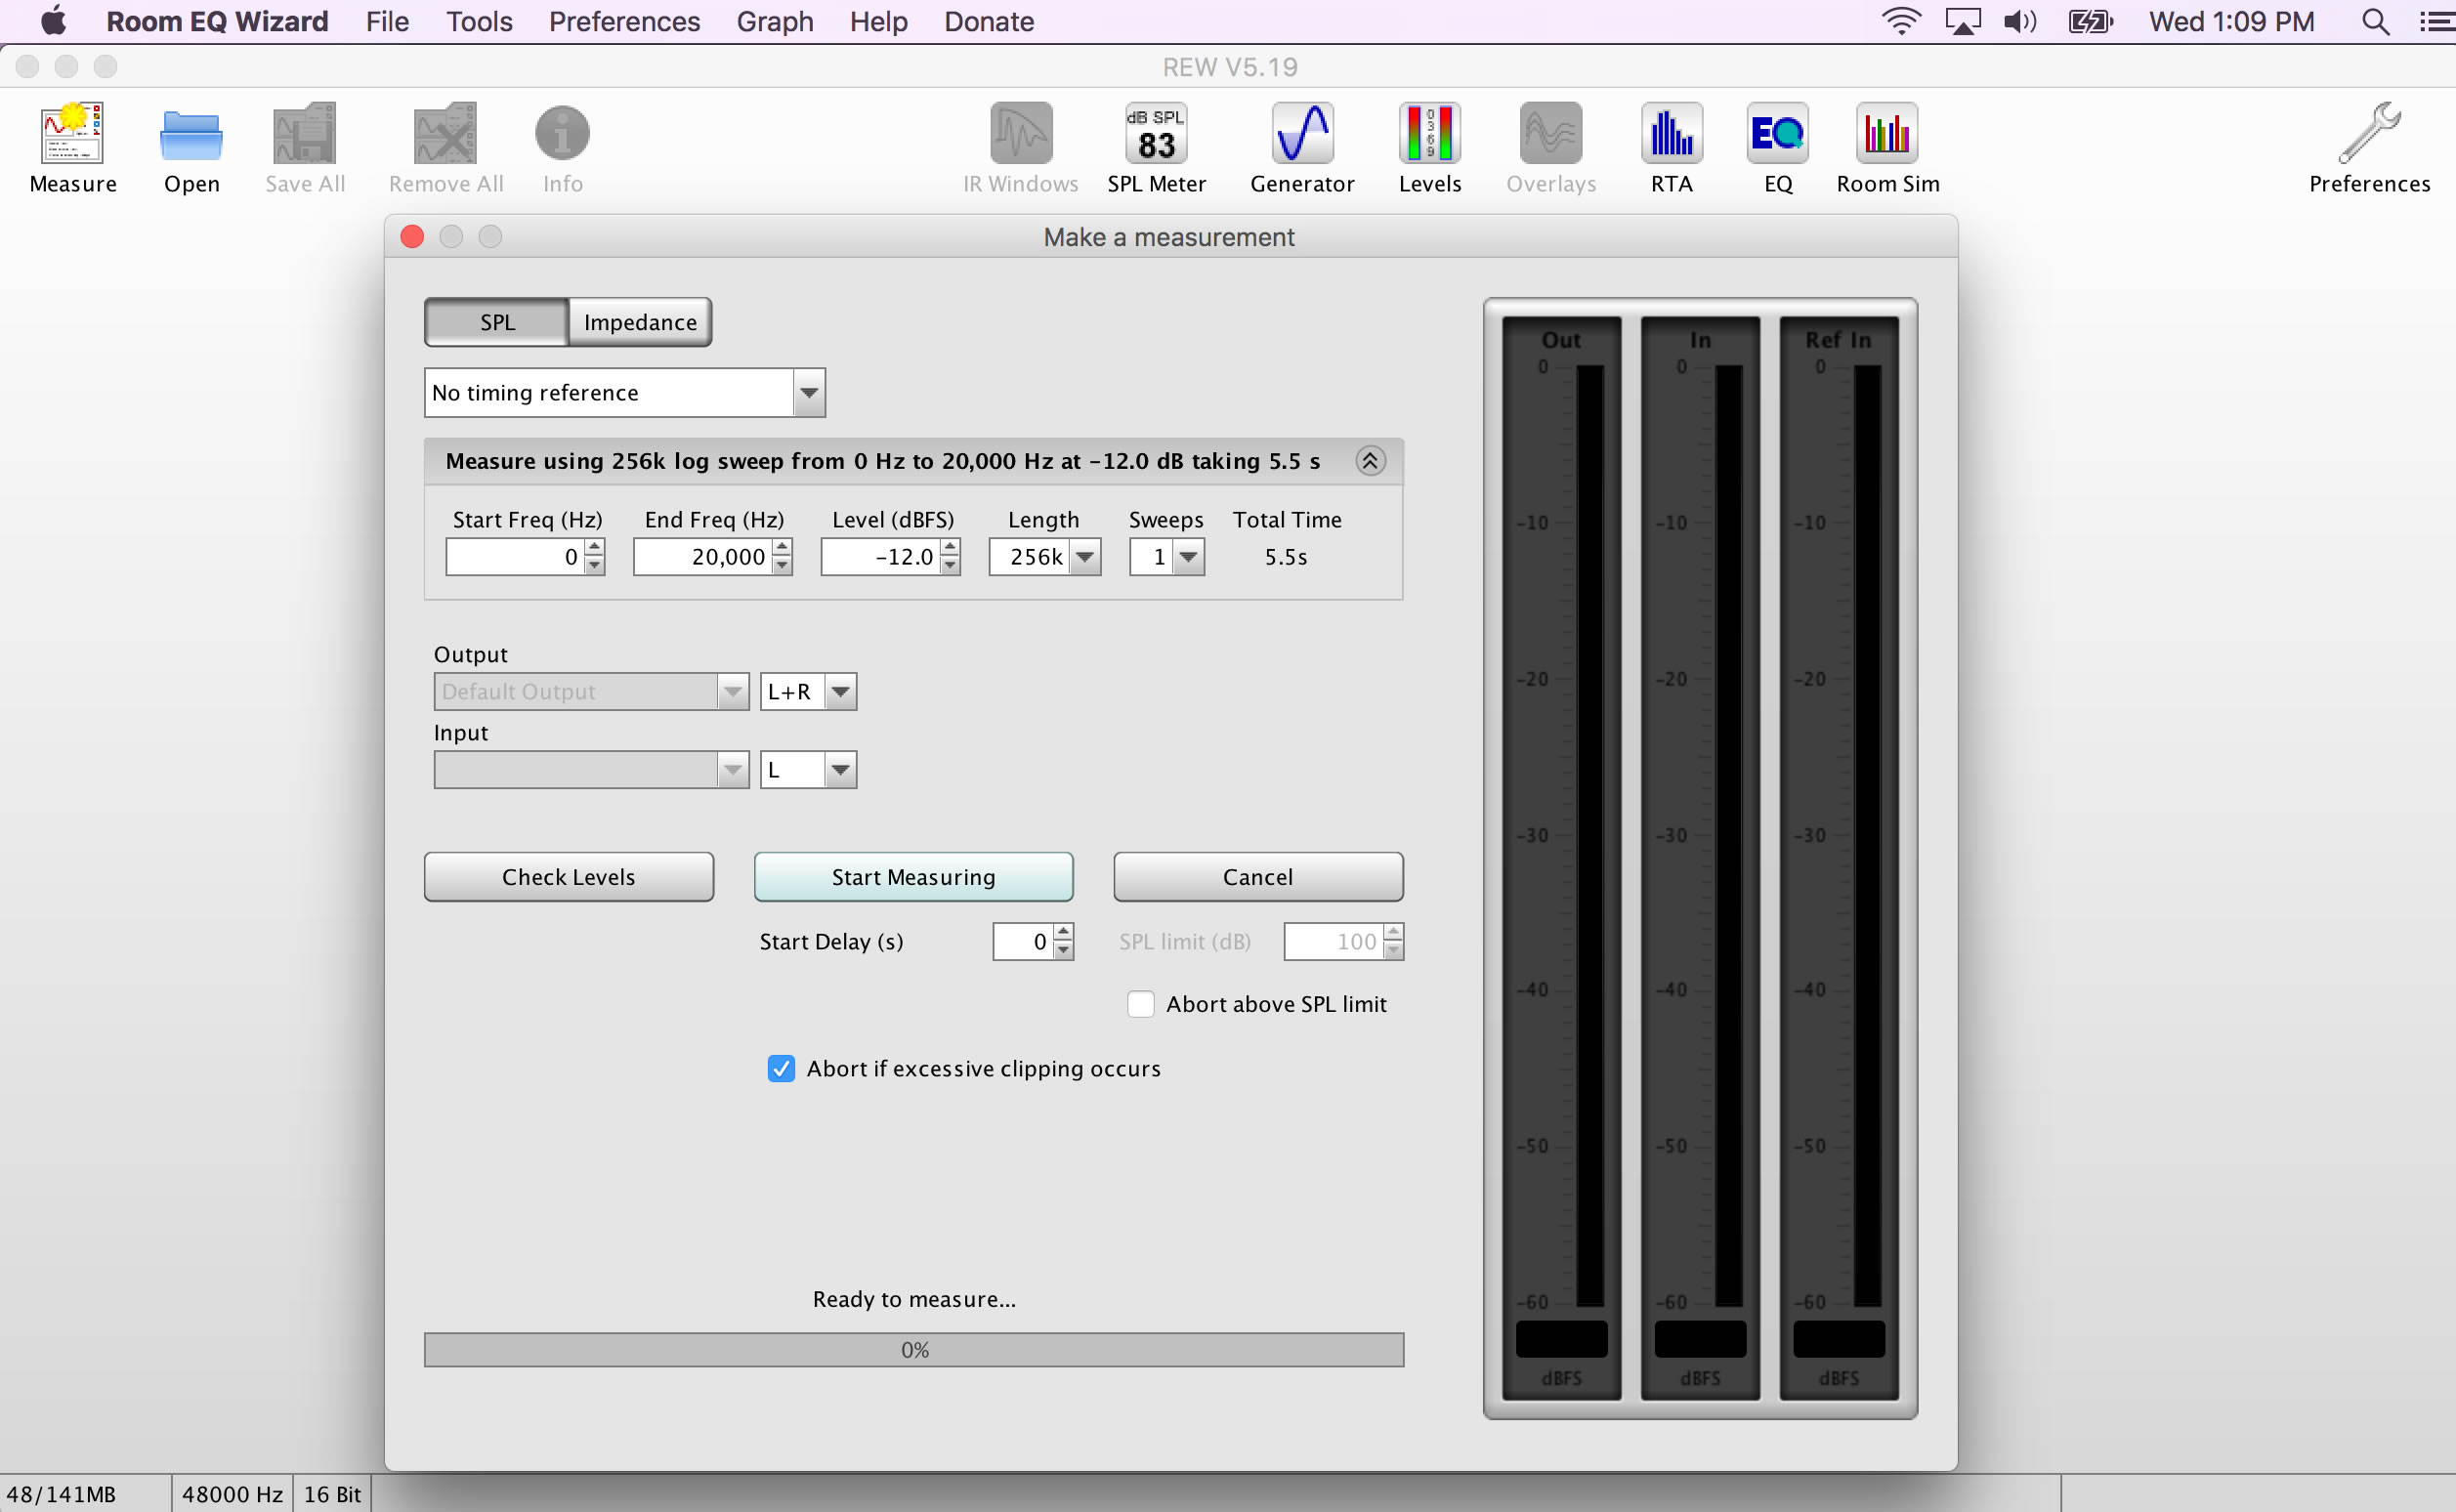
When you first open Room EQ Wizard, it's pretty bare. In the top left hand corner, you'll see a button that says "Measure". Click the Measure button and the Measure View will pop up.
On the Measure View, you will see a button that says "Check Levels". If you click this button, it will play noise for a few seconds and tell you what the program estimates the decibel level to be. If you can here the static coming out of your speakers, you are well on the path to measuring your speakers.
Calibrating Sound Pressure Level (SPL)
If you spent the $18 for a stand alone SPL Meter, then now is the time to break it out. If not, you can download and SPL Meter app for your phone. There are SPL Meters available for both iOS and Android.
If you don't have an SPL meter, a phone or any other option for an SPL meter, it is possible to guess. If your SPL levels is incorrect, the end result is going to be a set of filters for our DSP that are either too large or too small. But the overall shape of the filters will be the same. So, if you don't have any option for an SPL meter, you can guess, but you will have to scale/adjust your final filters. We'll look at how to do that later.
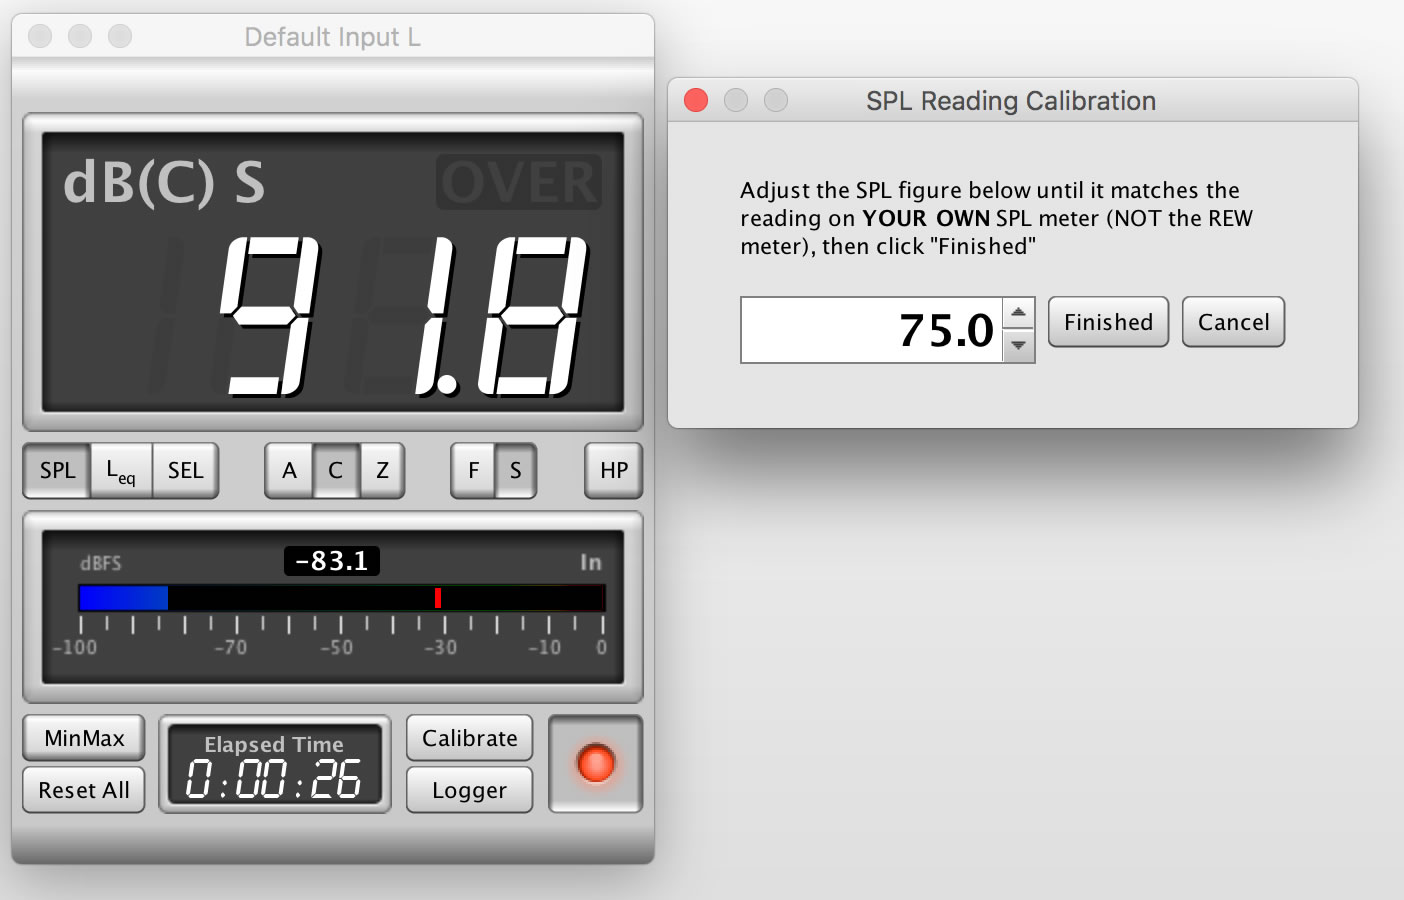
If you have any windows still open in REW, go ahead and close them. In the middle of the top row of buttons, you will see one called "SPL". Click on the "SPL" buttons to bring up the SPL Meter.
We are going to use your hand held SPL meter with the REW SPL meter to calibrate REW. On the REW SPL Meter that pops up when you click teh "SPL" button on top, click the "Calibrate" button to begin calibration.
REW will start playing noise in your speakers. You want to use your hand-held SPL (or your phone with an SPL meter app) to measure the decibel level. Normally, you'll want to turn the volume up on your system until your hand-held SPL meter is reading around 70 decibels. Once you've got the volume of your system up to this level, enter the value from your hand-held SPL meter into SPL Reading Calibration input and click "Finished". REW should now be calibrated to the SPL of your system.
Measuring Frequency Response
You can now close the SPL window, and click the Measure button in the top nav to bring up the "Make a measurement" window. In this test, we're going to be measuring both the Left and Right speakers at the same time, in order to get a single set of filters that we can apply to both right and left speakers. Be sure you have the Output set to "L+R" to measure both speakers at the same time.
Position you microphone at the ear level of your optimum sitting position (usually this means putting the mic into the spot forming an equilateral triangle between the two speakers and your microphone. You can also point the microphone straight at the ceiling. We will be using the 90deg calibration microphone calibration file for this measurement.
Click the "Start Measuring" button and REW will start playing a sweep of audio frequencies from low to high. We want a full range sweep from 0 Hz to 20,000 Hz
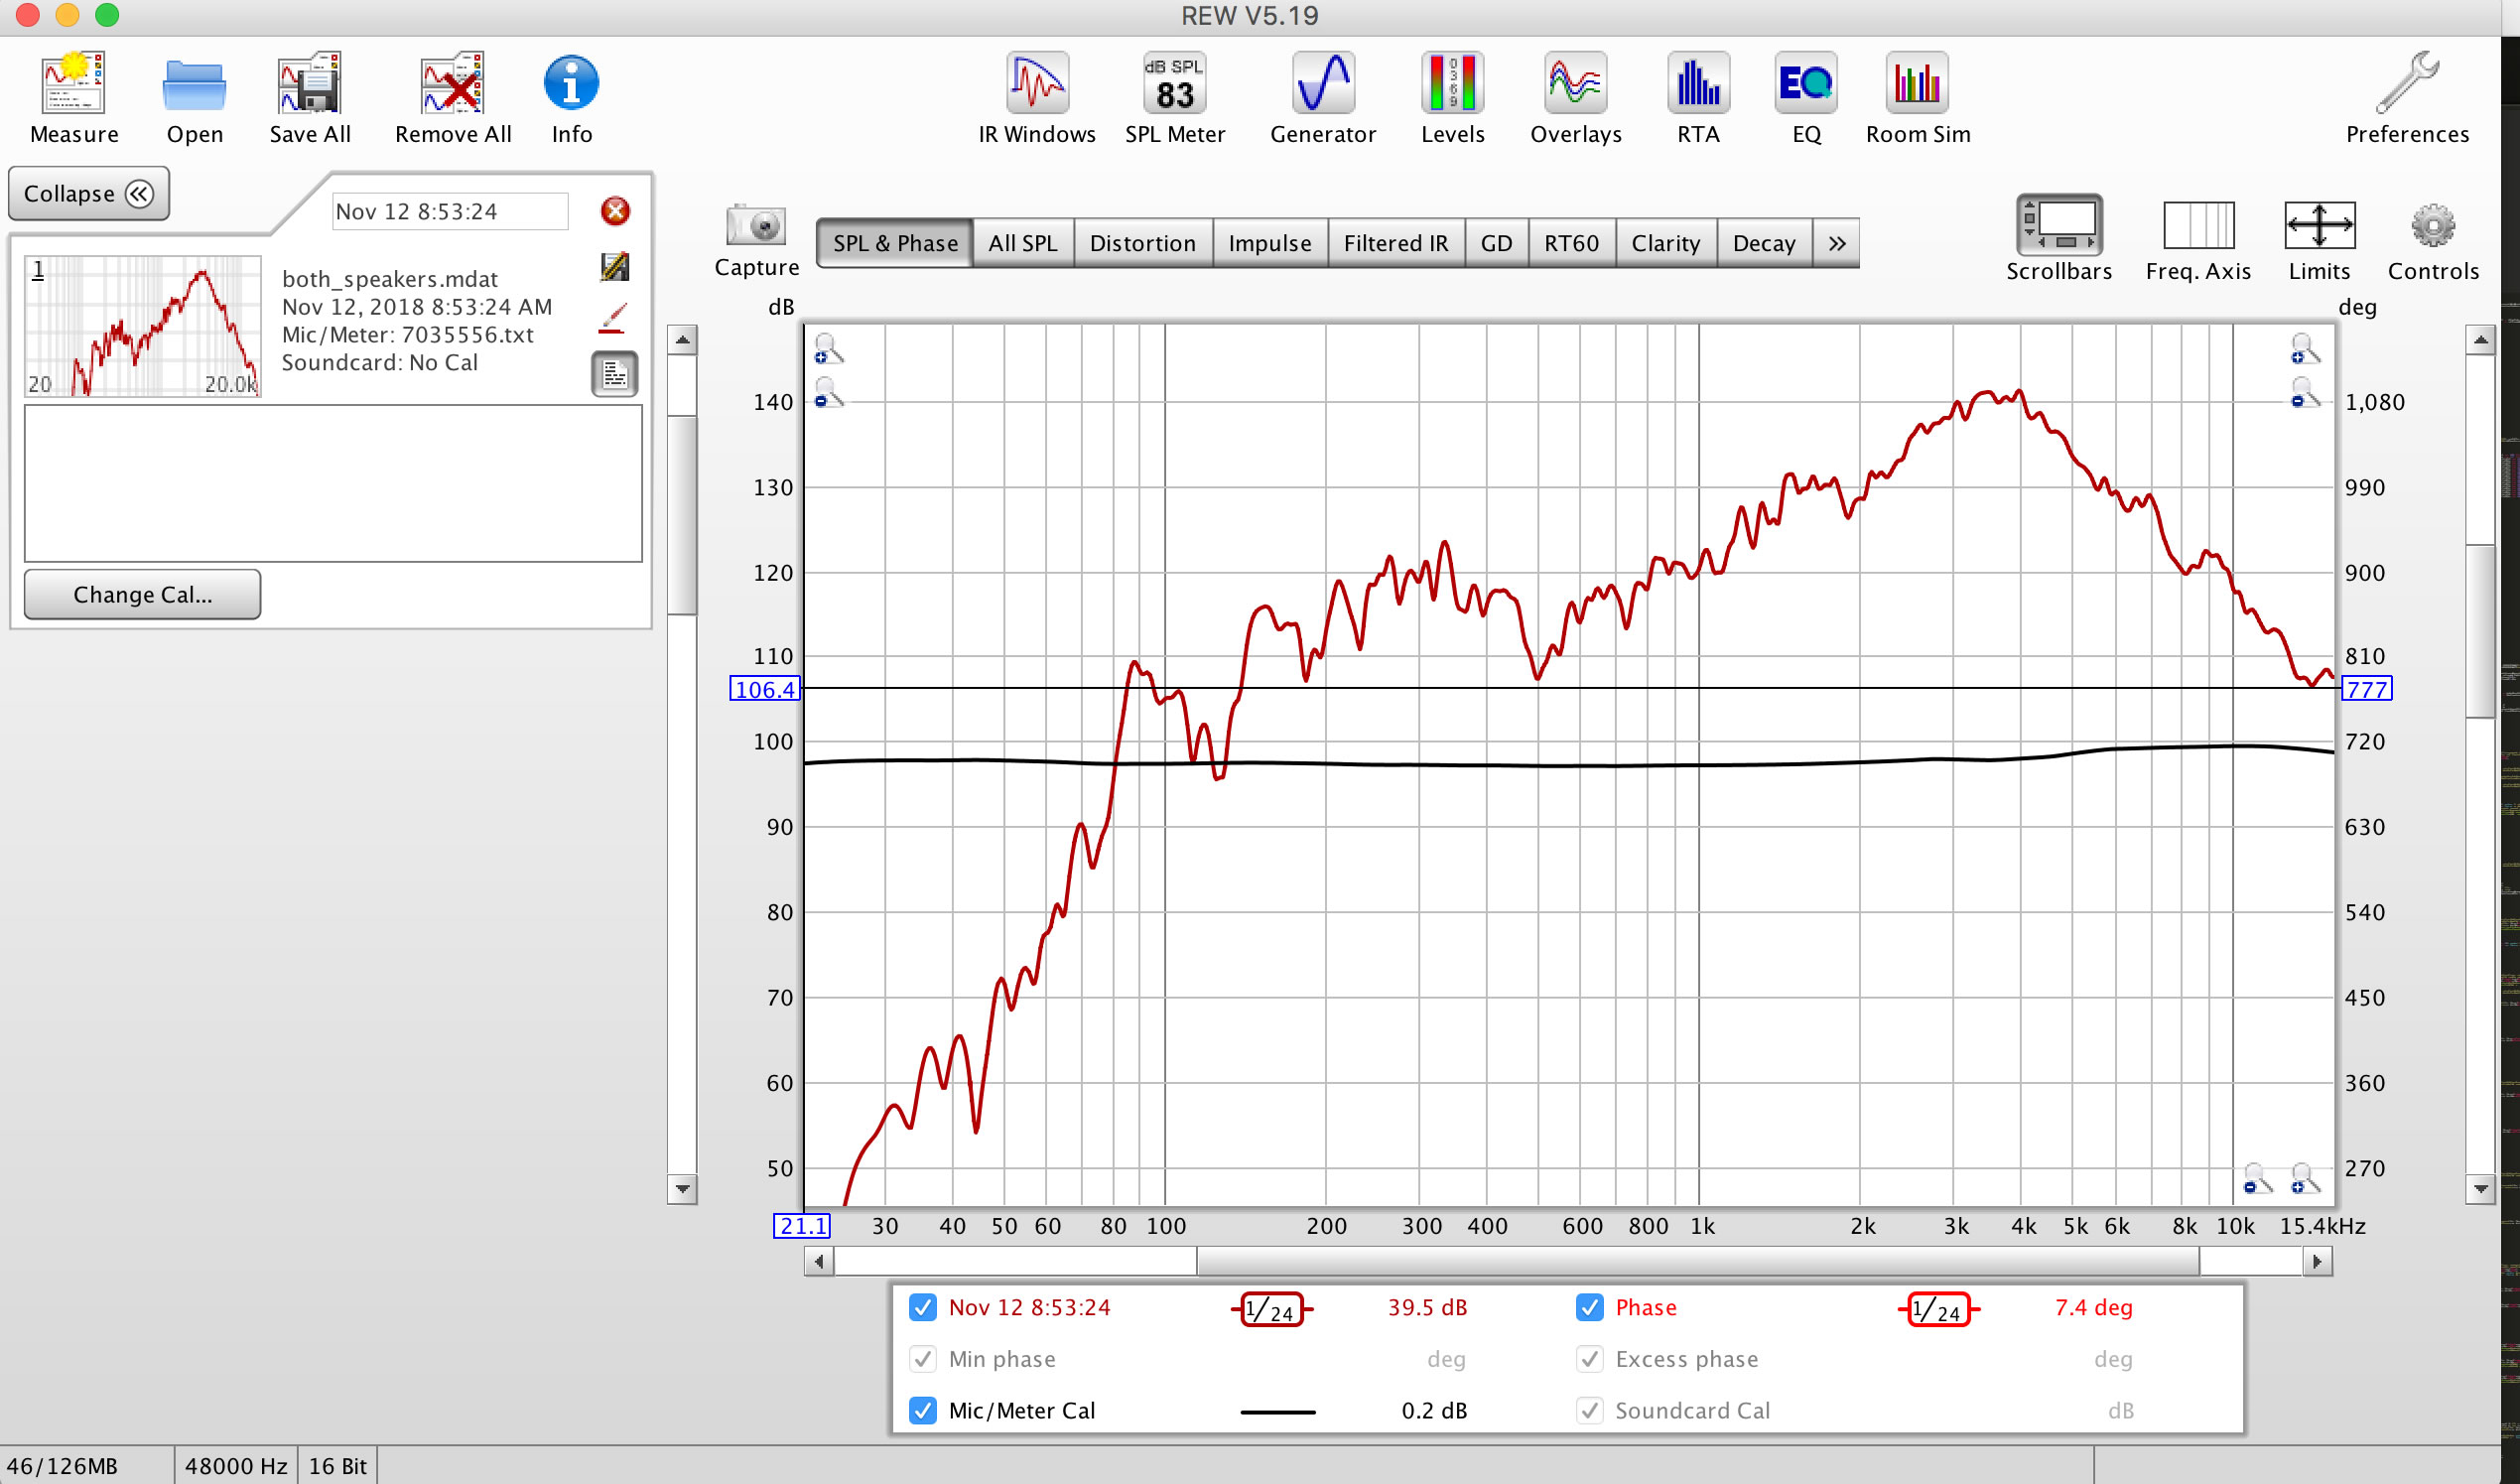
Once REW completes it's sweep, you will see a graph of the frequency response of your speakers. It may look quite jagged. To smooth this graph out, go to the "Graph" dropdown menu and click "1/24th smoothing". This will smooth out the graph to make it easier to see the real peaks and valleys in your frequency response.
Calculating Filters to Correct Frequency Response
At this point, we've done all of the hard stuff. It's time to let REW do it's thing and calculate the filters we need to put into our DSP to flatten out the frequency response.
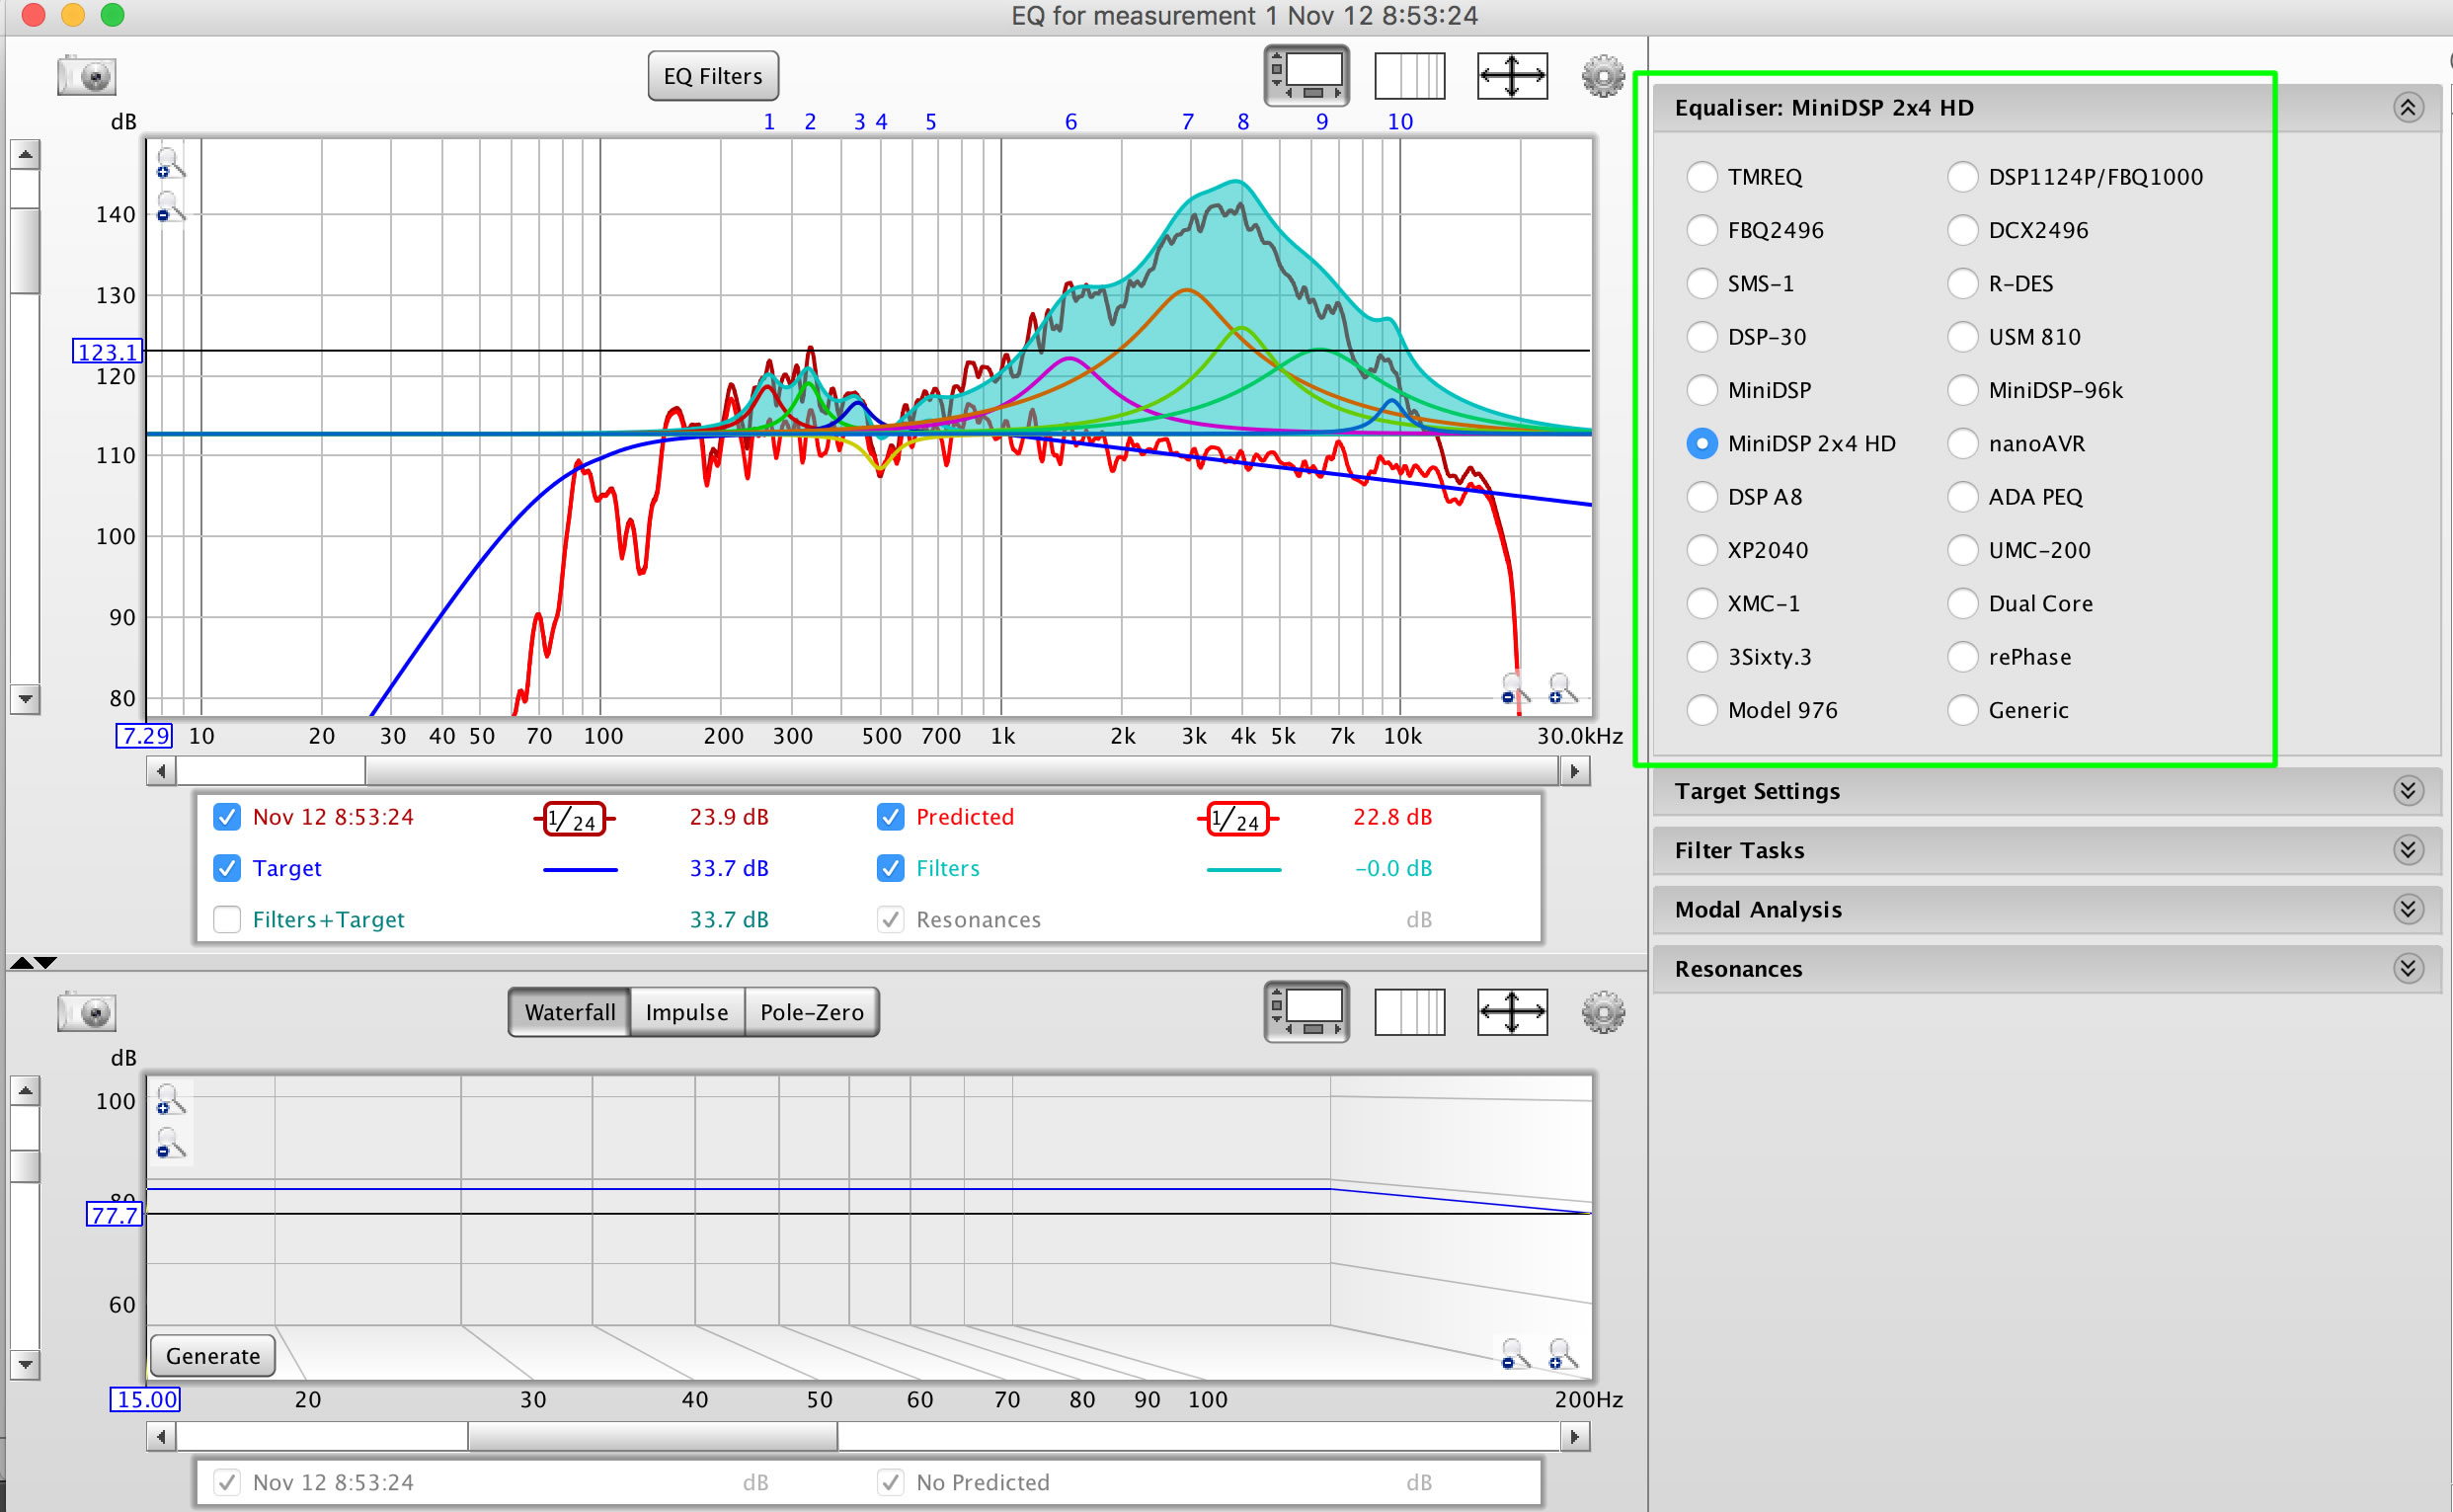
On the top toolbar in REW, click "EQ". This will open the EQ popup window.
A new window will pop up with an accordion of options along the right side. Starting with the first option, we need to select the type of DSP we are going to be using. This will let REW know how many filters we have at our disposal. In my case, I'm using the miniDSP 2x4 HD, which allows me to create 10 filters per channel. So I select that DSP in this menu and click on the next accordion item.
The next item in the accordion is "Target Settings". We will use this view to set the target decibel level for our speakers. For "Speaker Type" in our case, we want "Full Range".

This view has one of two very important buttons that look more like labels in this accordion view. Look for a clickable label near the bottom of the Target Settings panel that says "Set Target Level". Click "Set Target Level" and REW will set the optimal target output levels based on the frequency response graph. You can adjust this target up or down in this same view. But for our first go through, we can use the level REW calculated.
We can now go to the next panel in the accordion, "Filter Tasks".

There is another super important button in this panel that also looks like a label. The link that says "Match Response To Target" is probably the most important button in REW. And it hides in plain sight looking like a normal label.
First verify that your frequency range covers the entire spectrum you are working with, in this case going all the way up to 20,000 Hz. Once everything looks good, click "Match Response to Target" to see REW do it's thing. It will calculate a series of filters to be used by your DSP to flatten out your frequency response.
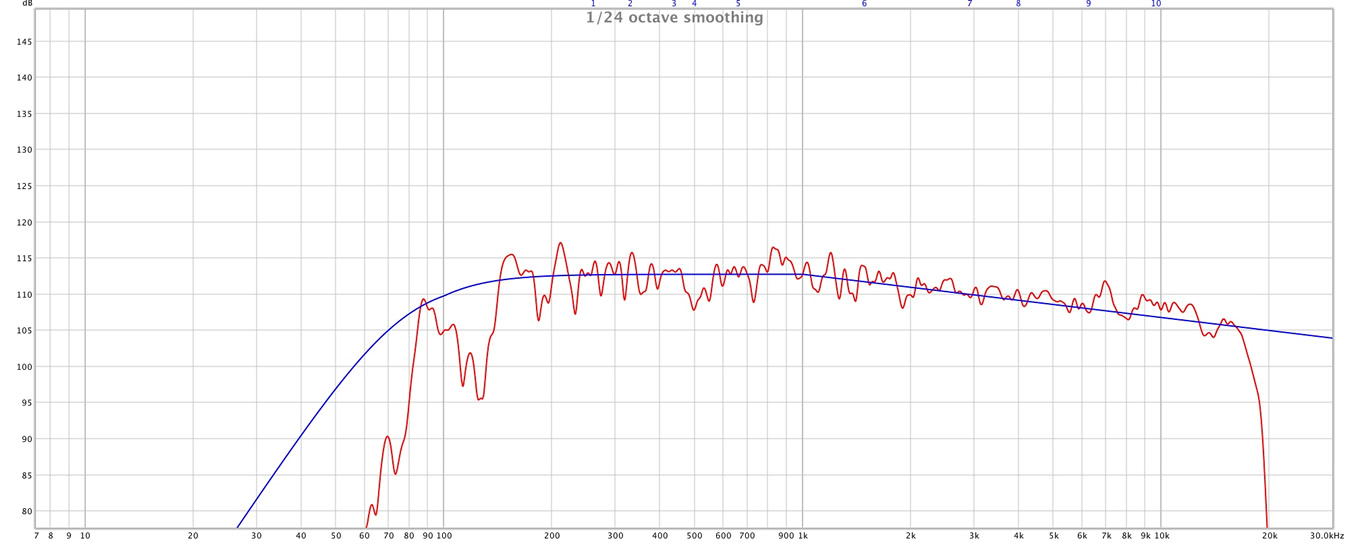
After applying these filters to our DSP, we can expect a very flat frequency response that matches our targeted output curve very closely. We see an expected falloff under 140 Hz, which is expected from a DML speaker. It is not going to be able to have a strong bass response without being extremely large. Our 4 x 2.5 foot speakers aren't large enough to express frequencies below 80 Hz. For that, we will need a subwoofer.
Above 140 Hz our frequency response is just about perfect. We can also clear see there is no need for a tweeter with these speakers. They are able to cover the whole range from 80 Hz to 18,000 Hz, now with a perfectly flat response across that whole range.
Transferring Filter Data From REW to Your DSP
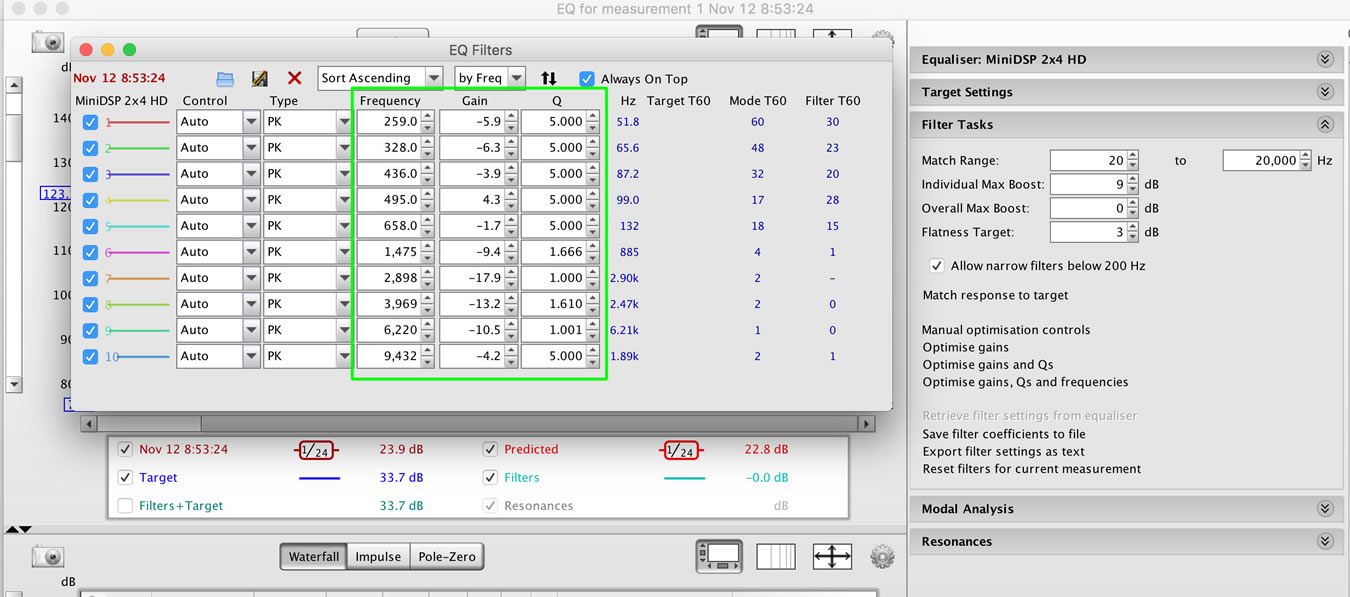
Still in the EQ window, and after clicking "Match Response to Target", notice there is a little button in the middle at the very top of your graph called "EQ Filters". Click on this button and another popup window will come up showing you the filter values REW has calculated.
We're really only interested in three values for each filter, the frequency, the gain and the Q factor (Q describes the slope of the curve we are trying to put into our audio signal).
At this point, it's easiest for me to copy these values into an Excel spreadsheet. If I need to make some adjustments to the filters after applying them, what I usually want to do is scale all of the gain values up or down by some multiple. It makes it easy to set up a spreadsheet so I can just put this multiple into one field and have all the new gains calculated automatically. Then I can just cut and paste from Excel. This workflow isn't optimal, but there is almost always some need to tweak these filter values. Already having them in a spreadsheet makes it easier.
If you didn't have an SPL meter earlier, and you just guessed at the dB level of the room, you'll definitely need to make scale adjustments to the gain values, so you just about have to put them in a spreadsheet and then multiply all the gain values by some amount up or down as needed. You won't normally be changing the frequencies and Q factors of your filters (at least not without a lot more experience doing this).
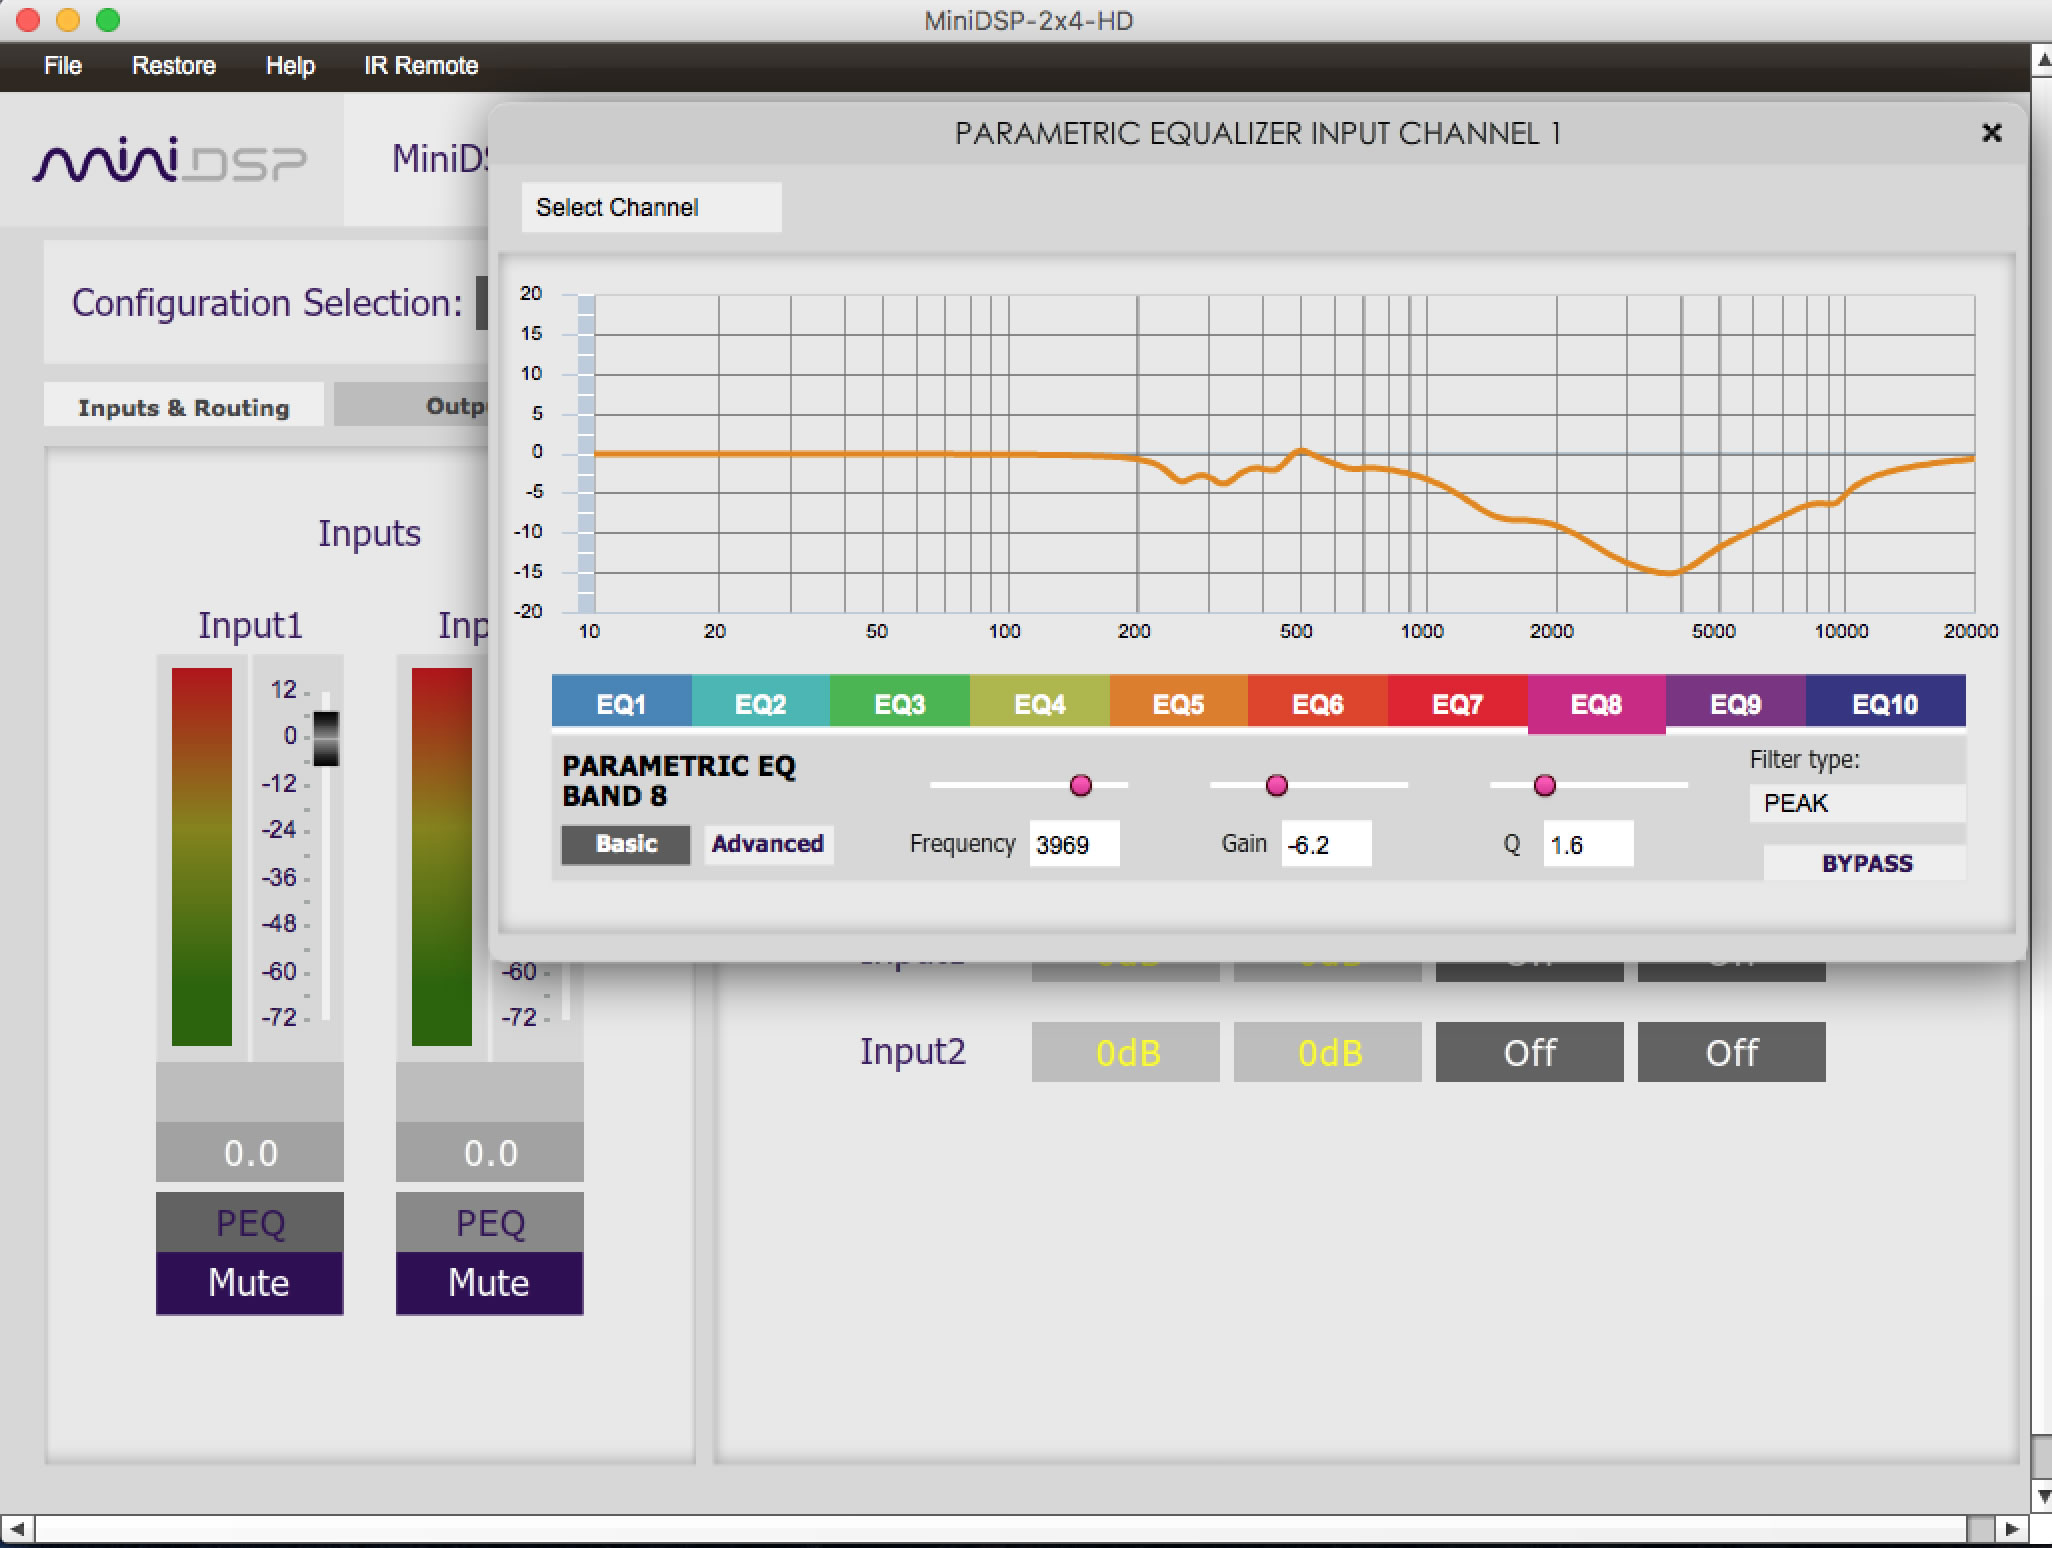
The HD version of the miniDSP 2x4 has a different user interface than most of the other miniDSP products. So these screen shots may look different than your software. The other miniDSP software actually has a much nicer interface to work in.
Regardless of which DSP you have, they will all have options for Parametric Equalization (PEQ) of the input signals. In this version of miniDSP, you have to click on each of the rainbow colored buttons to enter all ten of the filters created by REW. You may have fewer than 10 filters, even when REW knows your DSP has 10 filter options. Sometimes you can get it done with just a few filters.
In our case, the DSP does a great job of knocking down our huge peak on the high end. This really transformed our DML speakers from these shrill and very bright panels that hurt to listen to, into a amazing set of speakers that comfortably fills our workshop with sound.
Conclusion
In large spaces, and in rooms where you can hide DML speaker panels in the walls, DML speakers (once corrected with a DSP) make near perfect mid-range and high-end speakers. Once coupled with a good subwoofer, these may well be the finest speakers I've ever listened to.